
My first WordPress website was a blog about teaching. I thought I was too small for hackers to worry about. But I was wrong. I got hacked and lost years of work.
The key message is that if you have any kind of website, you need to protect it from being hacked. If you run a business website, you need to be even more protected.
But first, a few truths:
- Nothing you do can guarantee you won’t get hacked. But you can make it less likely and easier to bounce back if you are hacked.
- It is not as simple as installing a plugin and doing nothing else.
- Many online reviews and articles are advertising affiliate products (the author gets paid a commission if you buy the product).
I am not affiliated with any products I mention, I advise things that require you to do things beyond installing a plugin, and I outline:
- Free or low-cost options
- Fast options that don’t slow down your website
- The most secure options
Then, you can choose the options that best suit your needs.
1. Backup Regularly
Let’s start with the worst-case scenario. You get hacked. This is where backups are your best friend.
When it comes to security, your website is like the contents of your home. While you can and should take steps to stop your stuff from being stolen, you also take out insurance in case they are.
Backups are like an insurance policy for your website. If you do get hacked, you can restore your website fairly easily.
Some hosts offer backup services, but you can also create backups using a plugin, such as Duplicator or Updraft.
But now, how do you stop hackers from getting in to begin with?
2. Install & Set a WAF to Secure Your WordPress Website
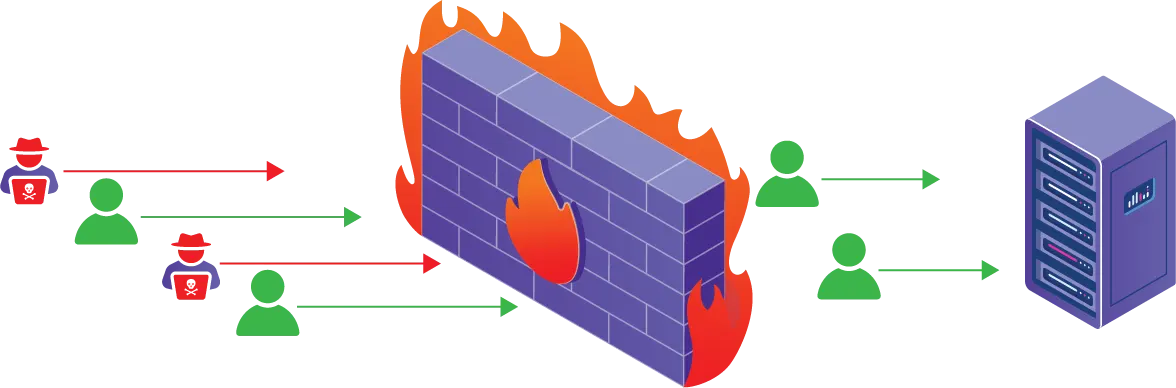
A WAF or Web Application Firewall acts as a filter between your website and people who want to visit your website (traffic).
The WAF monitors this traffic and then blocks any suspicious traffic while letting legitimate traffic through. It does so by comparing the requests being made by incoming traffic and comparing them to a ruleset of known threats.
I have personal experience with three WAF services:
- Wordfence free plugin
- Wordfence premium plugin
- Sucuri paid WAF service (only paid is available)
The key differences between Wordfence (free) and Wordfence (Premium) WAFs is:
- Updates to the ruleset for known threats is delayed by 30 days in the free version, but it updated in real-time in the premium version
The key difference between Wordfence and Sucuri WAFs is:
- Wordfence is a plugin and hence lives on your hosting company’s server. Sucuri is a cloud-based service. Hence, Sucuri does not slow down your server or your website.
Recommendations Based on Cost
If cost is your key consideration, go with the free version of Wordfence.
If you want a cheap option, but with better protection go with the premium version of Wordfence at $99 US per year.
Sucuri offers a slightly more expensive, but comparable firewall plan for $9 US per month.
Recommendations Based on Speed
Slow websites frustrate visitors and annoy Google. If speed is you’re your most important consideration, go with either Sucuri:
- Firewall at $9 US per month
- Platform at $199 US per year
Recommendations for Best Security
Use both the Sucuri platform and Wordfence premium. They play well together and offset each other’s weaknesses (cloud vs plugin).
3. Keep Everything on Your Site Updated
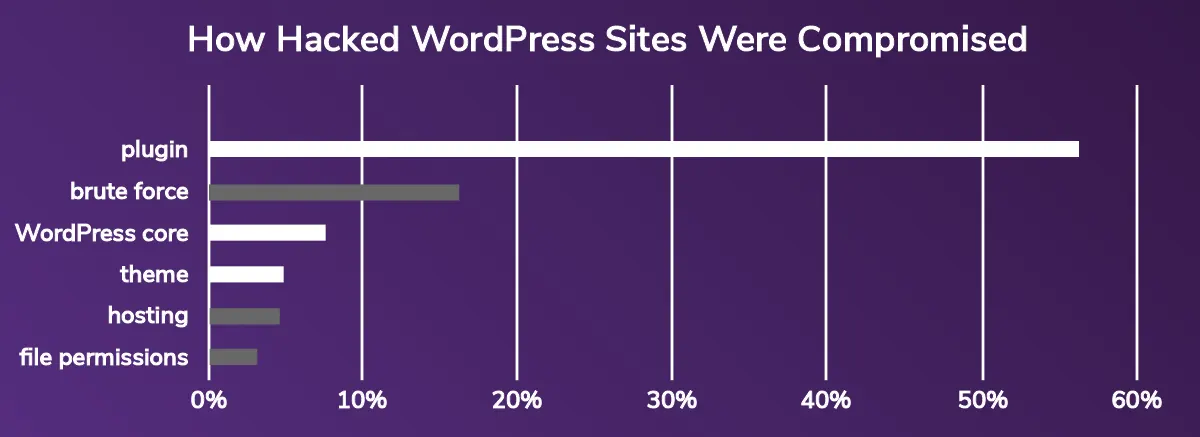
Most successful hacks come from vulnerabilities in your website’s code. In order of importance, this includes code within WordPress:
- Plugins
- Core
- Themes
Vulnerabilities are often detected and fixed before hackers find them. When hackers do find a vulnerability first, developers quickly patch it.
In either case, the best way for you to avoid being hacked through vulnerable code is to keep your plugins, WordPress version and themes up to date.
Sadly, Sucuri reports that 49% of hacked WordPress websites had outdated plugins, core files or themes when they were attacked.
Automatic Updates
You can set up automatic updates of plugins, themes, and WordPress core files. You can:
- Do this within the backend (Admin) section of your WordPress website
- Often do this through your host
Don’t do both.
While setting up automatic updates solves security issues with outdated code, it can cause other major problems. Too often, updates cause conflicts with existing code, and this can cause your site to crash.
At a minimum, regular backups can help you fix this problem. But they are not ideal.
Recommendation
The safest and best option is to clone your website on a separate domain (or subdomain). Then, install the updates and check for conflicts.
If there are no conflicts, update your real website. through your hosting company. If your host uses cPanel, go to Cpanel > WordPress Toolkit. Then click ˅ beside your domain name. Towards the bottom of the screen, you will see a link to Autoupdate Settings.
4. Automated Vulnerability Detection & Patching
Sometimes, updated code unwittingly contains vulnerabilities. So, when you update your plugin, theme and WordPress core files, you are providing new ways for hackers to get into your website.
WordPress, theme and plugin developers quickly respond with new updates as soon as such vulnerabilities are detected. But re-coding takes time, and time may be of the essence.
Enter vulnerability detection and patching services like PatchStack. You will be notified as soon as vulnerabilities are discovered. And, virtual patches will added while waiting for code fixes.
A virtual patch restricts access to the code (e.g., a plugin) until the developer updates the code to remove the vulnerability. This gives you some cover while waiting for the official code update.
5. Use Strong Passwords, Unique Passwords & a Password Manager
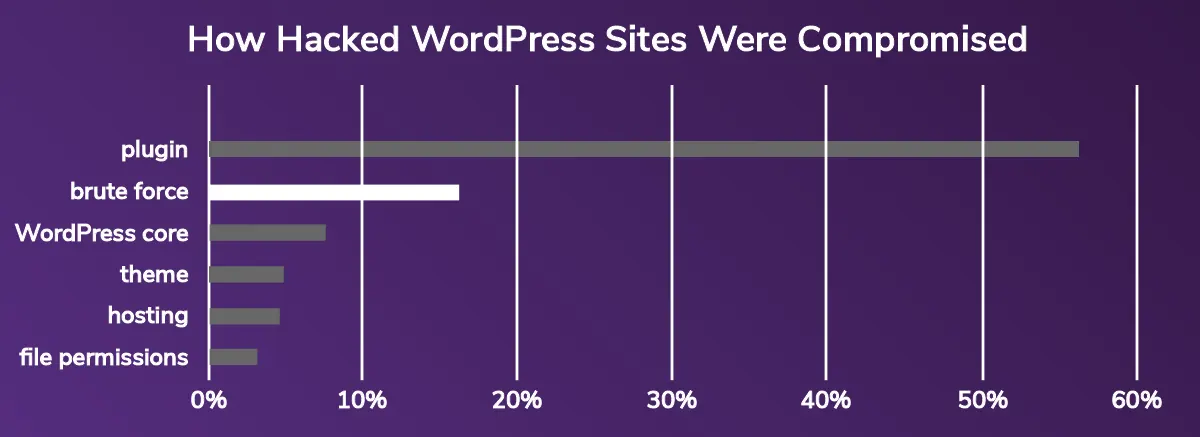
Strong passwords are important when securing your WordPress website because hackers can use automated bots to guess and check a huge volume of passwords. Over 12 months, Wordfence blocks over 10 billion bogus logins.
This is known as a brute-force attack, and it is a common way hackers gain entry into your website.
Strong Passwords
What makes a strong password? Two things:
- Length
- A random combination of letters (upper and lowercase), numbers and symbols.
At the time of writing this, Google recommends that your password has at least 12 characters.
For example, according to security.org the 8-letter word thousand would take a bot less than 6 seconds to crack. Yet, a password with 12 characters can take years.
While 12 is good now, as technology improves so does the speed at which bots can crack passwords. So, I recommend 16+ characters.
Due to dictionary attacks and improving technology, random passwords are better than passwords containing words. Words can be guessed (rapidly) as single entities, whereas a random string of characters cannot.
Further, by including numbers and symbols, as well as upper- and lower-case letters, you exponentially increase the number of guesses it takes to crack your password.
Avoid using dates of birth and names, including those of your pets, partner, children and employer.
Unique Passwords
This shouldn’t need to be said, but 66% of people use the same password across multiple online accounts. If one account gets hacked, you are giving the hackers the keys to everything.
Use a unique password for each and every one of your online accounts. Every account should have a different password. But how will you remember them? That is my next point.
Password Managers
Password managers like LastPass. 1Password and Dashlane offer you a way of securely storing and accessing your long list of unique passwords. They are more secure than other options because they:
- Use strong encryption
- Are built using zero-knowledge architecture
I avoid using browser password managers.
6. Use 2FA to Further Strengthen Your Login Process
According to hackers, adding 2FA to your login process is one of the best things you can do when securing your WordPress website. 2FA stands for two-factor authentication, and it is a great way to guard against brute-force attacks.
You may have already used it with some of your other online accounts, as it is becoming more common. It involves two steps (factors) when logging in:
- The typical username and password step
- A second step, where you receive a confirmation code or link
To set up 2FA on your website, you can use
- A specific plugin such as FluentAuth
- An all-in-one security plugin like Wordfence
Wordfence Instructions
To setup 2FA using Wordfence, you first need an Authentication App on your phone. You can choose one of many, including:
- Google Authenticator
- Microsoft Authenticator
- LastPass Authenticator
Once you have selected and set up an authentication app, you need to connect it to your WordPress website.
If you use Wordfence, you can set up 2FA by going to Wordfence > Login Security. Next, use your authentication app on your phone to scan QR code on the Wordfence > Login Security page. Then follow the prompts.
7. Protect Your Login with reCAPTCHA
Google created reCAPTCHA to help tell the difference between humans and bots. It is not a perfect system, but it does help to secure your WordPress website.
To use Google’s reCAPTCHA you need to have an existing Google account (e.g., Gmail). Then:
- Login to you’re the admin section of Google reCAPTCHA
- Add your website using the + sign in the top right of the page
- Select V2 Tickbox or V3 from the options at the top left of the page (read all of action 8 before choosing)
- Click the gear icon (settings) in the top right of the page
- Select the drop menu ˅ beside Google reCAPTCHA keys and leave this window open

You will need to copy and paste the two key codes that you see into one of two plugins.
If you are using Wordfence, you can paste the keys into Wordfence > Login Security > Enable reCAPTCHA. You also must:
- Tick the box enable reCAPTCHA
- Set your reCAPTCHA Human/Bot threshold score
Note, Wordfence only allows V3 reCAPTCHA keys. So, if you want to use Wordfence to enable reCAPTCHA, you must select V3 when setting up your codes in Google.
If you:
- Are not using Wordfence
- Are using Wordfence but prefer the V2 checkbox option
You can use the free plugin such as Login Security reCAPTCHA.
8. Limit Login Attempts to Secure Your WordPress Website
The way that hackers crack your login details is through guessing and checking. With the help of bots, they can guess and check at an incredible rate.
In addition to earlier items on this WordPress security checklist, you should limit the number of times a user can enter an incorrect username and password combination.
If you are using Wordfence, go to Wordfence > All Options > Brute Force Protection, then click enable and set:
- Lockout out over how many failures?
- Lockout after how many forgot password attempts?
- Count failures over what time period?
- Amount of time a user is locked out?
If you are not using Wordfence, you can use the free plugin WPS Limit Login.
9. Change Your Login Slug
On websites, a slug is an extra part at the end of your domain name. For example, the slug for this page is /wordpress-security-checklist.
Why change the slug? Because the default /wp-login and /wp-admin slugs are well known by hackers and the bots they use.
Of course, as with other actions in this WordPress security checklist, changing your login slug is not enough on its own. Yet, it makes it harder to hack your website.
You can use the free plugin WPS Hide My Login to change your login slug.
10. Harden WordPress
There are several ways to harden aspects of WordPress. Some of these are classed as critical, while others are just recommended. In the vast majority of cases, I recommend doing them all.
Critical
Set permission levels of the wp-config file to 600, of other files to 644, and for directories to 755
Block directory browsing preventing hackers from getting compromising information about your website.
Block access to the wp-config file which contains sensitive information about your website.
Block access to other sensitive files to stop hackers from getting this information.
Disable PHP execution in cache directories, as cached PHP files can compromise your whole website.
Change the default database table prefix to make it less obvious to hackers.
Change the default administrative username from admin to make brute-force attacks harder.
Critical
Block access to the xmlrpc.php file, as most sites don’t use it and it poses a security risk.
Forbid execution of PHP scripts in the wp-includes directory.
Forbid execution of PHP scripts in the wp-content/ and the wp-content/uploads directory.
Disable script concatenation for WordPress admin panel.
Disable file editing in WordPress Dashboard, and an extra layer of protection if one admin account is compromised.
Blocks bots that scan your website for vulnerabilities and overload your website with unwanted requests.
Block access to .htaccess and .htpasswd files, preventing hackers from exploring them.
What About SSL or HTTPS?
You should always have an SSL certificate that allows you to serve your website via HTTPS instead of the unencrypted HTTP format. It is considered standard practice and Google while rank HTTPS websites above comparable HTTP sites.
Yet, HTTPS doesn’t really protect your website from being hacked. Rather, it encrypts confidential information your website’s customers provide (e.g., their credit card details).
WP Wheelie’s Security Guide in a Nutshell
- Install a WAF (Web Application Firewall)
- Keep Plugins, themes and WordPress core files updated
- Use strong and unique passwords with a password manager
- Set up 2FA (two-factor authentication)
- Use reCAPTCHA on your login page
- Limit login attempts
- Change your login slug
- Disable XML-RPC authentication
- Strengthen critical files and folders
- Harden WordPress
